
When I first started to get comfortable playing jazz on the piano, I was eager to learn how to play with an ensemble. I knew my way through lots of tunes, and how to voice each chord. But, I didn't understand what my role was supposed to be in the rhythm section, or what I was supposed to do in order to support the other players.
So, what is "comping?" Comping is a jazz technique used by the rhythm section of a jazz ensemble to carry the chord changes, apply rhythmic style, and complement other musicians playing the melodically.
In the following sections, I'll break down what comping is, when you should use it, and give you some techniques to get started.
What do jazz players do when they comp? #
Comping is shorthand for "accompanying" or "complementing." When comping a member of the rhythm section plays the chords following the changes for the current tune, and sets the rhythmic tone for the performance.
As a member of the rhythm section, our job is to support other players who are playing the melody or taking a solo. We act as the bedrock of the band which instrumentalists and vocalists perform their solos.
To set the stage for the material ahead, take a listen to a recording of me comping over the changes to Misty:
Step-by-Step Video Training
As a premium member of Jazz-Library you will have access to our Jazz Fundamentals video course which has 70+ video lessons teaching you these comping rhythms, chord voicings, soloing strategies and more.
Which instruments comp in a jazz ensemble? #
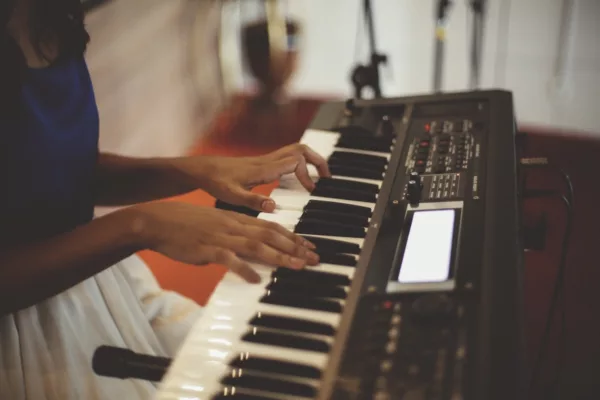
Comping is played by chordal instruments in the rhythm section, usually a piano, organ, or guitar. Sometimes this would include a vibraphone (Gary Burton could really comp), or even a jazz harp.
It's also very common for a musician to comp for themselves. For example, when playing solo a pianist may comp with their left hand while their right hand takes a solo.
Situations where you should comp #
Comping is a technique for accompaniment, and so it's appropriate any time there's something to accompany.
- Behind a singer / melody
- Behind an instrumental solo
- Behind your own solo playing
Two aspects of comping: rhythm & chords #
As the rhythm section, our primary responsibility is to set the groove by laying an improvised accompaniment using rhythm and chord voicings.
- Rhythm establishes the feel. Fast/slow, mild/energetic, controlled/frantic.
- Chords/notes establish the tunes chord changes, and setup the harmony.
The rhythm section feeds off each other to create rhythmic variety and add form to the tune, which the soloists can perform on top of.
Rhythm: Setting the groove #
While playing the chord changes is important, nothing is more important than rhythm. You might think that the soloist needs you to play the chords to set them up, but a great soloist will imply the chords through the lines they create. But, they can't cover the groove without you, so that should be your main focus.
In a sense, you should think about the rhythm first. The rhythm will dictate when you play, and then you use the chords to play in those moments. Beginners often make the mistake of thinking they have to always be playing chords and as such, they sacrifice the rhythm, become monotonous, and over-complicate the whole process of comping.
There are common rhythmic comping patterns you should learn to get yourself going. These provide you several frameworks which you can use to guide your playing. You never want to be robotic and repeat these blindly, but rather follow your ear using these as a guide to inspire you.
Charleston Rhythms #
The first rhythms you should learn are the Charleston and Reverse Charleston. These are simple syncopated rhythms inspired by the 1920’s style of dance with the same name.
These rhythms are versatile, working in a variety of swing styles, and at different tempos.
The Standard Charleston
The standard Charleston comping rhythm plays on beat 1, plus the “and of 2”:

Take note of the articulation. The off-beat is slightly emphasized in order to carry the swing feel.
The Reverse Charleston
This variation of the Charleston reverses the emphasis. Starting with the emphasized off-beat, the comping rhythm plays on the “and of 1” plus beat 3.

Varying the Charleston
When comping in this style, feel free to switch up your comping between the standard and reverse styles.

You can also take some inspiration with the rhythm and insert your own variations following your ear. The following example doesn’t strictly follow the Charleston rhythm, but is clearly inspired by it.
Playing in a 2 feel. #
The 2 feel is characterized by the bass player playing half notes. This creates space, and a calmer feel, even at fast tempos. Here are few common rhythms you can use in a 2 feel:
Half-Notes:
You can play half-notes right on beats 1 and/or 3. By doing this you'll leave the swing groove up to the other instruments, but it's a simple way to cover your bases harmonically:

Half-Notes with Syncopation:
To bring that swing feel back into your playing we'll keep playing long notes, but we'll introduce syncopation and start some notes off the beat.

Half-Notes with Chord Stabs:
Introduce a bit more swing feel by occasionally throwing in a quick chord stab on an off-beat. This helps you swing even more by introducing articulation.

Playing in a 4 feel #
As we learned earlier, a 2 feel emphasizes half-notes — feeling 4 beats as 2. Similarly a 4 feel emphasizes all 4 beats by emphasizing the quarter notes.
There’s many ways to do this, but most traditionally its done through a walking bass line, or a “4 on the floor” strumming pattern (aka “Freddie Green Comping”)

Chord Anticipations:
Use syncopation to anticipate upcoming chords. You don’t have to wait strictly until the exact beat the chord is notated to change. By playing the chords slightly ahead of the downbeat, you can help lead into the change.
This is typically done by switching on the “and of 4” ahead of the beat.

Red Garland Comping Rhythm
Red Garland’s left hand could really swing. His comping emphasized the “and of two” as well as the “and of four.” He counted on the rest of the rhythm section to handle the downbeats (unless playing solo), which allowed him to focus on the off-beat swung-eighth notes.
I’ve written a much deeper dive into the Red Garland rhythm over in this article.

Locked Hands Comping Rhythm #
The last comping rhythm we’ll discuss here is one that Bill Evans was known for. Simply put, this isn’t a repeating rhythmic pattern, but rather a style where you pair the melodic rhythm with the comping rhythm, playing them in sync.
Check out this video from my friend Jeremy Siskind on the topic:
Stop Time Comping #
Practice stop time comping, where the rhythm section plays solo hits on the one in rhythmic unison. This keeps the time alive, but creates variety from a standard 2 or 4 feel.

Leave Space #
Silence is hip, so don't sacrifice it. The trick is to strategically leave space based on what you hear the soloist doing. Listen carefully for their queues.
You can create space a few ways:
- Just stop playing for a few beats, measures, or even longer.
- Change from a 4 feel to a 2 feel, or even to stop time.
- Change your comping energy. Pull back from fast, energetic comping to a more subdued, mild and sparse style.
Rhythm Guided Listening: Emmet Cohen #
As an example, listen my guided listening session for After You've Gone by Emmet Cohen, featuring Patrick Bartley on saxophone. I discuss many aspects of the comping as they happen in this video:
Carrying The Chord Changes #
While I believe laying down rhythm is the most important comping skill, we can't play a rhythm without playing notes (leave that to the drummers!). And so, it's critical for us to learn what notes we should use when we are comping.
There are a few steps to learning the changes of a tune:
- Learn the form. Is it a standard 32 bar AABA form? Where do things repeat? Which parts of the changes are people going to solo over? How are we going to intro and outro the tune when we perform?
- Learn the chords / voicings. Are there any chords you don't know fluently? How will you voice them throughout?
- Learn the tempo / groove. This will help determine how busy your comping should be. Slower ballads may warrant wide, lush chords which are held. Faster swing tunes may use more "stabby" rhythmic hits. Latin grooves may call for Son Montuno or other patterns.
- Consider the other players. Are you the only comping musician or will you take turns with another player? Is there a bass player -- do you need to cover the root? Will the drummer drive the groove or you?
You should feel comfortable playing the changes by memory, and in various keys. You won't have time to be reactive, the band will expect you to keep up and help drive the tune forward. You really need to know the changes backwards and forwards, inside and out.
Piano voicings used for comping #
There's no set rule for what type of voicings you should use when comping. When playing with an ensemble, we generally prefer some variety of rootless voicing, but there many types of voicings to choose from.
My "go to" voicing to base my comping on is a 4 note rootless voicing using 3-7-9-5 ("A voicing") or 7-3-5-9 ("B voicing"):

Check out my series on major chord voicings, minor chord voicings and dominant chord voicings for more voicing options to practice.
Guitar voicings for comping #
Just as on the piano, the guitar has many different options for voicing chords when comping. I would start by focusing on "drop 2" and "drop 3" voicings.
These voicings are easier than a standard "close-position" voicing since they lay more comfortably under your fingers on the fretboard.
- Drop-2 voicings take a close position 7th chord and drops the 2nd note from the top by an octave.
- Drop-3 voicings follow the same concept, except they drop the 3rd note from the top instead of the 2nd.
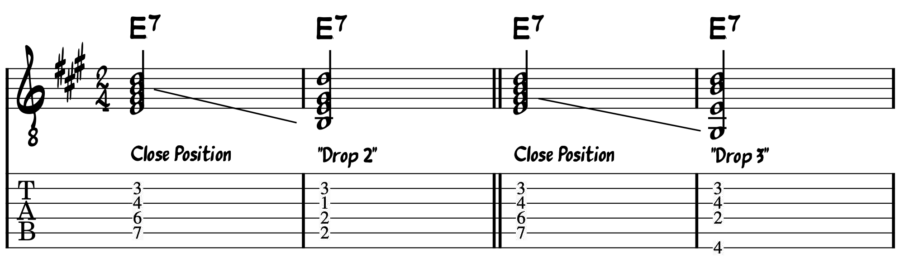
It's important to know all of your chords in both of these voicings so you can achieve smooth voice leading.
Changing register in your comping #
Learn to play in both the high and middle ranges of your instrument. You'll require different voicings for each situation.
Stay out of the range of the soloist. If the soloist is playing up high, you'll want to pull down into the middle range of the piano. Likewise, for a more baritone instrument, you'll want to comp up higher on your instrument.
Practicing Rhythmic Comping #
To learn these rhythms we will practice by doing something we would never do in a performance -- play them monotonously throughout a whole tune. Try the following exercises:
- Set your metronome to 80 bpm and comp the Charleston rhythm over a ii-V-I in each key. Ramp up your metronome slowly over time up to 160bpm.
- Repeat the same exercise with the Reverse Charleston and Red Garland rhythms.
- Practice alternating between 2 and 4 feel by playing a 2 feel comping pattern for one head the 12 bar blues, and then a 4 feel on the next time through. Alternate at various tempos and keys.
- Invent more practice exercises for yourself
To further reinforce your new skill, put on a backing track and play each of these patterns over the whole tune. Do this over many tunes, at different tempos, until you can't get them wrong.
When you are comping in a real world situation, you'll follow your trained intuition. The rhythms you've learned will be "in your hands" and you'll be able to invent musical patterns on the fly as you play. You'll even find that you deviate from the literal patterns, but stay in the groove. That's cool, go with your ear! At any point if you struggle with this go back and spend more time with the patterns individually.
Comping Counterpoint Melodies #
Once you've mastered basic comping rhythmic patterns and voicings, you can start to introduce your own counter-melodies that play against the soloist. These are often played during phrase breaks in the solo, or when the soloist takes a breath.
You should take care when you do this to avoid stepping on the soloist or stealing the spotlight. You are still creating an accompaniment, but just adding some motion for added interest.
Using chord inversions #
Perhaps the simplest way to create motion is to invert your chords, or switch between voicings. This lets you stay entirely on "safe" notes, but still introduce some motion.
Creating motion by creating top note melodies #
Another technique would be to play a single note melody by moving just the top note of your voicing. Generally, stay within the scale of the chord you are playing over so that you don't clash with the soloist. Over time you'll learn what you can and can't get away with.
What are your favorite recordings? I'd love if you'd share them with me on Twitter.